The Starting Point
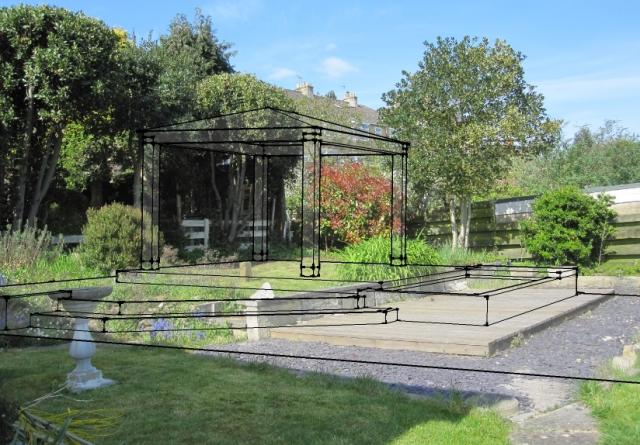
This photo shows what the garden looked like back in April 2011. You can see that the area to the right is lower (by about 50cm) and that on the left there's a slight slope. In the middle (just to the right of the low wall/step) is an old concrete garage base that the previous owners had attempted to disguise by putting some decking on it and surrounding it with slate chippings.
Our first idea was to raise the decking and surround it with a 'U' shaped pond, but a friend advised that we were just having our ideas restricted by the existing structure. So we turned to more exotic ideas....
... and drew up a list of 'wants' for the project. These included a roofed gazebo and Koi pond. We also thought that it would be good if we created a 'party space' to allow us to enjoy the garden to the full for as much of the year as possible. And so we thought we'd include a fireplace and built-in barbeque in the gazebo.
Enter Sketchup!
I used Google's Sketchup
to create the designs that you see here.
Sketchup is an brilliant, free 3-D design package that allows
you to create models that you can look around. You can even
superimpose pictures onto photographs (look at the gallery).
Sketchup is really great for visualising how
things will look.

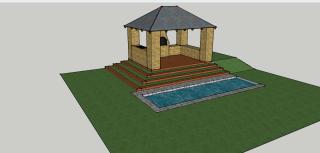
This was my first design. It did, to be fair take me ages to learn the tool, put in a model of the garden and then build the model, but it was fun. The idea was, more or less, to put the pond where the concrete was, and to use the existing topography and build a stone-built structure above it. You can see the fireplace and the barbeque (on the left).
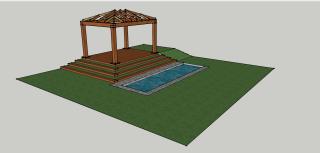
Next, we asked some builders for quotations. The first just never came up with a quote, and the second quote was so very expensive that we almost just gave up! But the discussions with both were useful and so we scaled back the plans. No more stone-built structure (labour costs and materials were both factors); no barbecue (we figured that charcoal was messy in any case) and no fireplace (we can add that later, we figure). And so this slightly less grand design emerged...

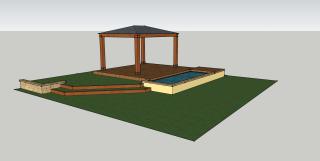
After this, we talked to another builder (we'd concluded that the first probably didn't want the work very much, as the estimate was so frighteningly high and anyway we wanted a second quote for comparison). We knew this builder quite well, and had seen work that he had done for a friend. Well, we were in for another shock. Yes, our ideas all looked fine, except for the pond. Digging more than a metre down would compromise the builder's insurance and "costs would spiral". So we should once more re-visit the design. The garden was actually stepped and so we decided that a "half-sunken" pond would be a good compromise. It would be level with the floor on the "uphill"; side, and built up on the other side. This would allow us to enjoy the pond in two ways, either looking down on it, or sitting on the retaining wall.

This picture shows the final design. It was a lot of work on Sketchup, but we were very pleased. (actually, the design here is slightly tweaked to reflect the eventual reality, but that's really just the stone wall on the left). So, that was the design work
done..... Now to get on with the build. Actually,
there were plenty of design decisions that we had yet to make, but these
were more technical than aesthetic and so they're in the 'Technical'
area of the site.
It's really worth taking the time to learn now to use Sketchup, and I found it fascinating. The video tutorials are very well presented and show you efficiently how to get reasonably quick and good results.

One of the really great features of Sketchup is that you can overlay your design onto a photograph. This means that before you move from building a model to building the real thing, you have the best idea possible of what it's really going to look like. You have to love it!
Your Design - Some Suggestions
There are a load of things to think about with the design - and only one of them is how it should look. Here is a list of things that are worth thinking about so that you end up with a design that really works for you.
Electricity: You definitely need electrical supply and it's worth thinking about this at the outset. Laying and hiding cables is relatively easy when the garden is all dug up! Drainage: Cleaning filters will involve dumping relatively large amounts of water each week. If you can design in a soak-away or other drainage, it will make getting rid of the excess water easy Water supply: Whilst you can certainly top up the pod using a hose, it might be worth fitting permanent pipework to maintain the water level automatically if it's not too inconvenient Pond Protection: Keeping herons off your pond is probably important, so integrating protection into your design seems like a good idea. I haven't quite worked out what my end solution to this is yet. Maintenance. You will need to do weekly maintenance and this is much easier if you have easy access to filters, pumps, switchgear and so on. My filtration is nicely integrated into the design, but it's not good for access. Aeration. I didn't think of this until right at the end. As a result, I have two flexible pipes feeding air stones in the pond. With hindsight, an aerated bottom drain might have been a better solution and could have been integrated with no visible pipework.
The cost of your pond project will drive many of your decisions. There are some costs that you can reduce through careful design considerations. One is getting rid of the waste from your excavations and this can easily add up. Waste removal from the excavations for our small pond summed to some £700. If you can accommodate this waste into landscaping elsewhere, then you can avoid much of this.